> ## Documentation Index
> Fetch the complete documentation index at: https://docs.granvl.com/llms.txt
> Use this file to discover all available pages before exploring further.
# Settings, tab by tab
> A screenshot-led walkthrough of every Settings tab, what it controls, and when to check it.
Settings holds the workspace-level decisions: the things that apply across every funnel and campaign rather than to only one of them. Most tabs are set once. **Ad Guardrails**, **AI**, and **Activity** deserve regular attention once an agent has write access.
The tabs are grouped below by the job they do. Each step tells you where to go, what to check, and why it matters.
## Workspace identity
**What to do.** Open **Settings → Domains** to see every custom domain, its connection status, and its domain-level configuration.
**Why it matters.** A funnel published to an unverified domain will not resolve. This is where you catch that before paid traffic reaches it. Per-domain logos, legal links, custom scripts, and CSP settings also live here.
 Full setup is in [Domains](/guides/domains).
**What to do.** Open **Settings → Brands** when one workspace contains more than one brand or client. Each brand gets its own products, ICPs, angles, funnels, and brand kit.
**Why it matters.** A Brand is the boundary that stops one strategy library, palette, or tone from bleeding into another. The active brand in the sidebar scopes what Strategy shows you.
Full setup is in [Domains](/guides/domains).
**What to do.** Open **Settings → Brands** when one workspace contains more than one brand or client. Each brand gets its own products, ICPs, angles, funnels, and brand kit.
**Why it matters.** A Brand is the boundary that stops one strategy library, palette, or tone from bleeding into another. The active brand in the sidebar scopes what Strategy shows you.
 See [Strategy](/concepts/strategy) and [Brand kits](/guides/brand-kits) for the records that sit inside this boundary.
**What to do.** Open **Settings → Billing** to review the plan, payment method, invoices, and metered add-ons such as extra AI credits, storage, and SMS verification packs.
**Why it matters.** This is the single place to check how a usage increase affects the bill before it becomes a surprise.
Billing is not pictured because it is a straightforward plan, payment method, and invoice screen.
## Guardrails and AI
These are the two settings to confirm before you give an agent real autonomy: what it may spend, and what data granvl's hosted analysis may use.
**What to do.** Open **Settings → Ad Guardrails** and set the workspace-wide maximum daily budget. Add tighter per-account caps when one ad account needs a lower limit.
**Why it matters.** These limits apply to anything created through granvl or your agent. They are human-only settings, so an agent cannot loosen its own leash.
See [Strategy](/concepts/strategy) and [Brand kits](/guides/brand-kits) for the records that sit inside this boundary.
**What to do.** Open **Settings → Billing** to review the plan, payment method, invoices, and metered add-ons such as extra AI credits, storage, and SMS verification packs.
**Why it matters.** This is the single place to check how a usage increase affects the bill before it becomes a surprise.
Billing is not pictured because it is a straightforward plan, payment method, and invoice screen.
## Guardrails and AI
These are the two settings to confirm before you give an agent real autonomy: what it may spend, and what data granvl's hosted analysis may use.
**What to do.** Open **Settings → Ad Guardrails** and set the workspace-wide maximum daily budget. Add tighter per-account caps when one ad account needs a lower limit.
**Why it matters.** These limits apply to anything created through granvl or your agent. They are human-only settings, so an agent cannot loosen its own leash.
 | Layer | What it is | Who can change it |
| -------------------- | -------------------------------------------------------------------------------- | ----------------------------------------------- |
| **Platform ceiling** | A hard \$200/day cap on any campaign or ad-set budget granvl creates | Nobody. It is a product decision, not a setting |
| **Workspace cap** | `Max daily budget` across every ad platform. It can only lower the effective cap | Owner or Admin |
| **Per-account caps** | Maximum daily spend and maximum percentage budget raise per change | Owner or Admin |
There is no MCP tool that reads or writes these settings. Every agent-driven budget write passes through them.
The per-account daily cap uses the account's highest actual single-day spend over the trailing seven days plus the new budget being added. Paused drafts count as $0 until a human activates them. A maximum raise percentage limits one change, so a $100 budget with a 10% limit can move to \$110 in one edit.
Keep a separate spending limit in the platform's own ads manager as a second backstop.
**What to do.** Open **Settings → AI** to review the workspace's monthly credit pool, the feature-by-feature usage breakdown, and the hosted AI analysis setting.
**Why it matters.** Every AI feature and teammate draws from one shared pool. This is where you see what is consuming it and decide whether granvl's hosted analysis may read funnel data.
| Layer | What it is | Who can change it |
| -------------------- | -------------------------------------------------------------------------------- | ----------------------------------------------- |
| **Platform ceiling** | A hard \$200/day cap on any campaign or ad-set budget granvl creates | Nobody. It is a product decision, not a setting |
| **Workspace cap** | `Max daily budget` across every ad platform. It can only lower the effective cap | Owner or Admin |
| **Per-account caps** | Maximum daily spend and maximum percentage budget raise per change | Owner or Admin |
There is no MCP tool that reads or writes these settings. Every agent-driven budget write passes through them.
The per-account daily cap uses the account's highest actual single-day spend over the trailing seven days plus the new budget being added. Paused drafts count as $0 until a human activates them. A maximum raise percentage limits one change, so a $100 budget with a 10% limit can move to \$110 in one edit.
Keep a separate spending limit in the platform's own ads manager as a second backstop.
**What to do.** Open **Settings → AI** to review the workspace's monthly credit pool, the feature-by-feature usage breakdown, and the hosted AI analysis setting.
**Why it matters.** Every AI feature and teammate draws from one shared pool. This is where you see what is consuming it and decide whether granvl's hosted analysis may read funnel data.
 * Credits are the display unit at 1 credit = \$0.01, and the pool resets at the start of each UTC month.
* The breakdown includes funnel analysis, daily brief, analytics summaries, funnel summaries, insights, agent chat, and research.
* Hosted AI analysis is off by default. It requires an explicit opt-in and acceptance of the current third-party AI data policy. A material policy update causes the workspace to be prompted again.
## Connections
**What to do.** Open **Settings → Tracking** and review the status for each domain and platform. Open a platform configuration and send a test event before launching traffic.
**Why it matters.** A badly wired pixel usually does not throw an obvious error. It under-reports quietly, so this screen is the fastest way to confirm the numbers are trustworthy.
* Credits are the display unit at 1 credit = \$0.01, and the pool resets at the start of each UTC month.
* The breakdown includes funnel analysis, daily brief, analytics summaries, funnel summaries, insights, agent chat, and research.
* Hosted AI analysis is off by default. It requires an explicit opt-in and acceptance of the current third-party AI data policy. A material policy update causes the workspace to be prompted again.
## Connections
**What to do.** Open **Settings → Tracking** and review the status for each domain and platform. Open a platform configuration and send a test event before launching traffic.
**Why it matters.** A badly wired pixel usually does not throw an obvious error. It under-reports quietly, so this screen is the fastest way to confirm the numbers are trustworthy.

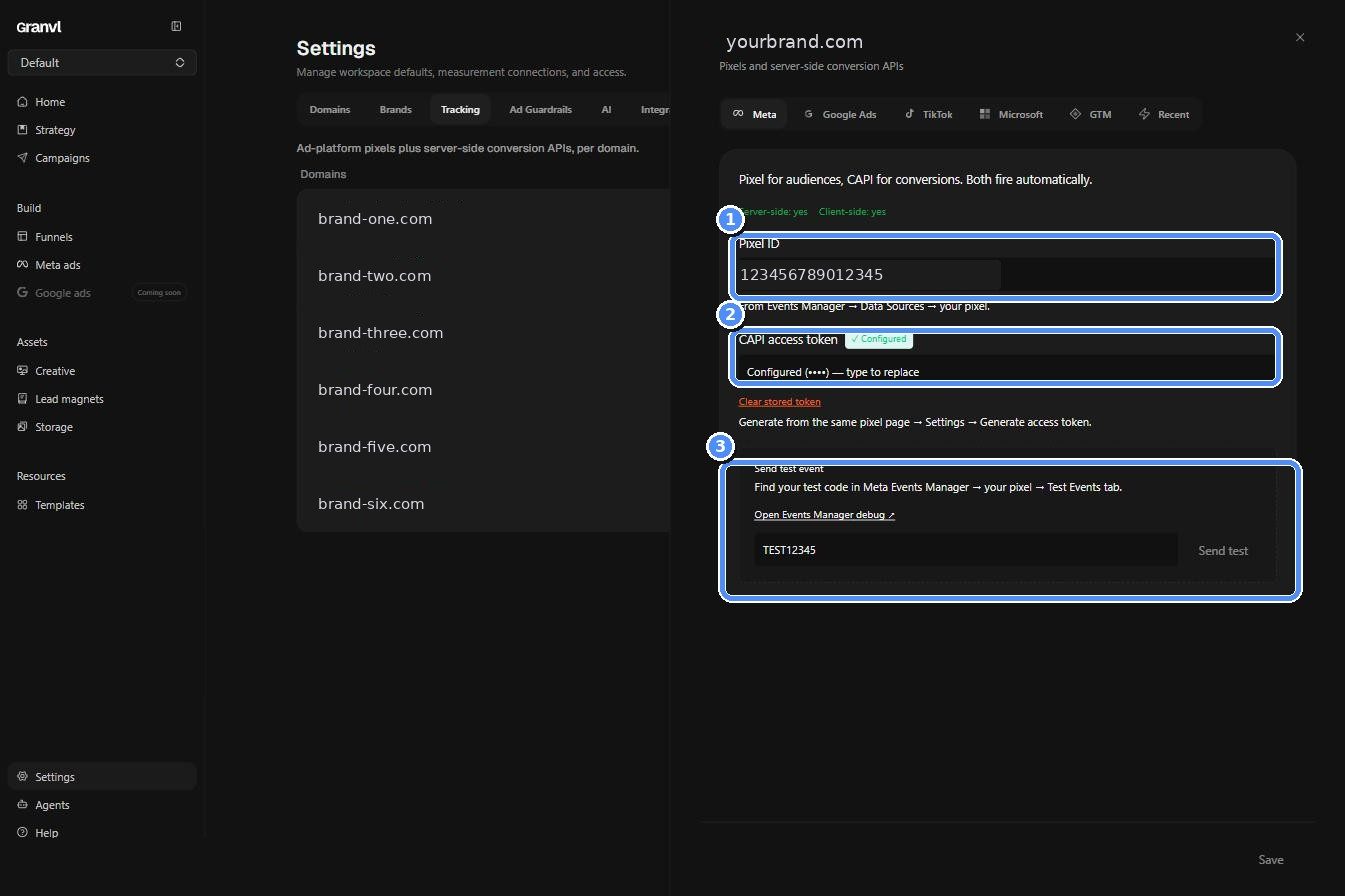 See [Pixels and conversion APIs](/guides/tracking-pixels) for setup details.
**What to do.** Open **Settings → Integrations** to connect a CRM, ESP, store, webhook, or lead network as a destination for form submissions.
**Why it matters.** A lead form posts directly from the visitor's browser to the destination. granvl routes the request but never stores or reads the lead itself.
See [Pixels and conversion APIs](/guides/tracking-pixels) for setup details.
**What to do.** Open **Settings → Integrations** to connect a CRM, ESP, store, webhook, or lead network as a destination for form submissions.
**Why it matters.** A lead form posts directly from the visitor's browser to the destination. granvl routes the request but never stores or reads the lead itself.
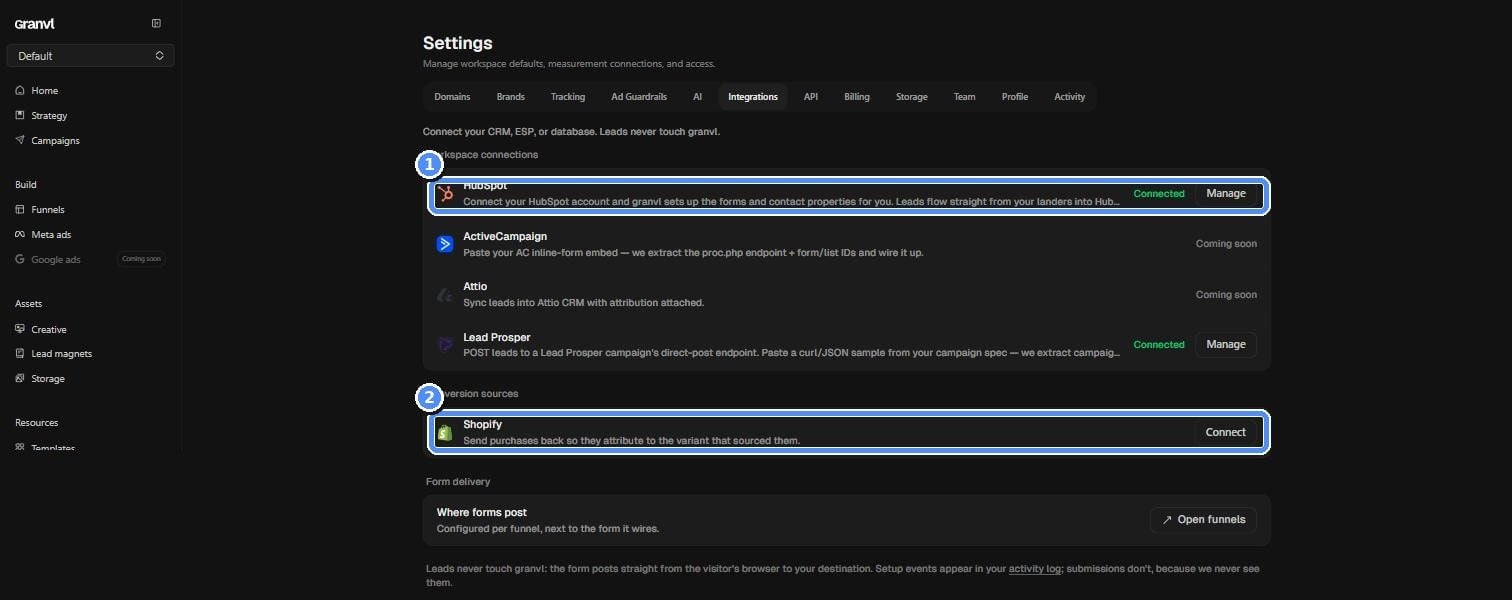 See [Forms](/guides/forms) and [How zero-PII works](/concepts/zero-pii).
**What to do.** Open **Settings → API** to generate and manage the keys that connect a headless MCP client to the workspace.
**Why it matters.** A key is shown once, belongs to the workspace where it was created, and may have an expiry. Treat it like a password: copy it when it is created and revoke it immediately if you suspect a leak.
See [Forms](/guides/forms) and [How zero-PII works](/concepts/zero-pii).
**What to do.** Open **Settings → API** to generate and manage the keys that connect a headless MCP client to the workspace.
**Why it matters.** A key is shown once, belongs to the workspace where it was created, and may have an expiry. Treat it like a password: copy it when it is created and revoke it immediately if you suspect a leak.
 See [Teams, roles and API keys](/guides/teams-and-api-keys).
## Resources and people
**What to do.** Open **Settings → Storage** to review the shared asset pool and see which store is using space. The default workspace quota is 1 GB.
**Why it matters.** Every uploaded ad creative and page asset draws from the same workspace pool. Check it before a large upload rather than after that upload fails.
See [Teams, roles and API keys](/guides/teams-and-api-keys).
## Resources and people
**What to do.** Open **Settings → Storage** to review the shared asset pool and see which store is using space. The default workspace quota is 1 GB.
**Why it matters.** Every uploaded ad creative and page asset draws from the same workspace pool. Check it before a large upload rather than after that upload fails.
 Published page HTML does not count toward this pool. Baked pages have a separate cap.
**What to do.** Open **Settings → Team** to review everyone with workspace access and the role each person holds.
**Why it matters.** Roles gate guardrails, billing, secrets, and ad-account connections. Review access periodically, just as you would for any shared business account.
Published page HTML does not count toward this pool. Baked pages have a separate cap.
**What to do.** Open **Settings → Team** to review everyone with workspace access and the role each person holds.
**Why it matters.** Roles gate guardrails, billing, secrets, and ad-account connections. Review access periodically, just as you would for any shared business account.
 The complete permission table is in [Teams, roles and API keys](/guides/teams-and-api-keys).
**What to do.** Open **Settings → Profile** to review your name, email, role, status, password controls, sign-out controls, and shortcut to API keys.
**Why it matters.** This is your account, not the workspace. Use it to confirm your access, rotate your password, or reach your keys without searching through workspace settings.
The complete permission table is in [Teams, roles and API keys](/guides/teams-and-api-keys).
**What to do.** Open **Settings → Profile** to review your name, email, role, status, password controls, sign-out controls, and shortcut to API keys.
**Why it matters.** This is your account, not the workspace. Use it to confirm your access, rotate your password, or reach your keys without searching through workspace settings.
 **What to do.** Open **Settings → Activity** and filter the combined human-and-agent audit log by person or funnel. Repeated actions are grouped together.
**Why it matters.** This is the literal answer to “why did this change?” Every agent edit appears beside teammate edits, using the agent's own description of what it did.
**What to do.** Open **Settings → Activity** and filter the combined human-and-agent audit log by person or funnel. Repeated actions are grouped together.
**Why it matters.** This is the literal answer to “why did this change?” Every agent edit appears beside teammate edits, using the agent's own description of what it did.
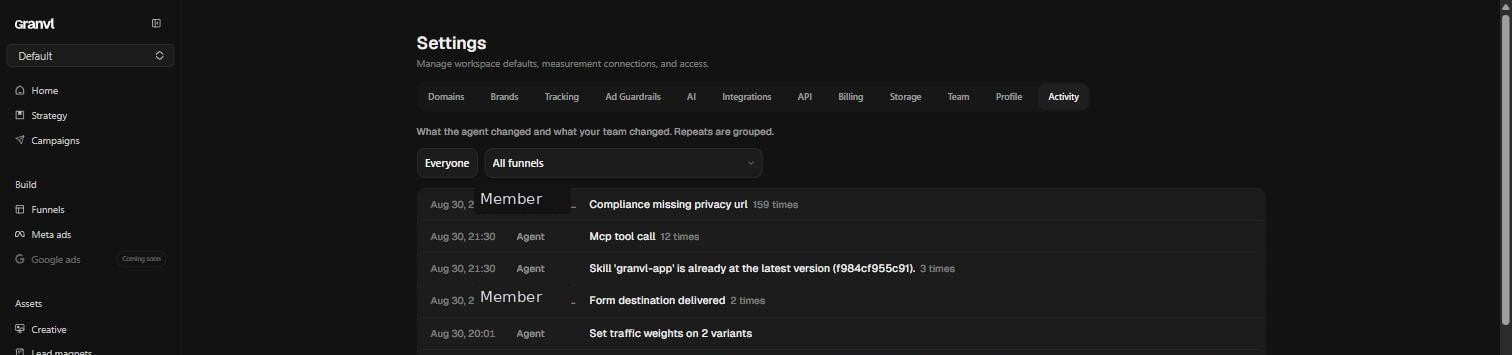 A useful entry says *“Generated two variants for the spring offer”* instead of *“Done.”* Your agent can read the same feed with `get_activity_log`.
Once an agent can act on the workspace, make Activity part of the routine. Check it the same way you would check a teammate's changelog.
A useful entry says *“Generated two variants for the spring offer”* instead of *“Done.”* Your agent can read the same feed with `get_activity_log`.
Once an agent can act on the workspace, make Activity part of the routine. Check it the same way you would check a teammate's changelog.